Centos8使用docker配置gitlab,邮件设置,域名URL访问 |
| 发表者:admin分类:应用服务2021-12-14 10:24:28 阅读[1317] |
Centos8使用docker配置gitlab,邮件设置,域名URL访问
通过docker或是podman容器化安装gitlab,然后设置smtp邮件,使用自定义域名访问。
1,环境。
系统:Centos8
容器:docker 映射端口: 6443-->443,6080-->6080,6022-->22 /也就是说gitlab需要使用 443,6080,22三个端口。
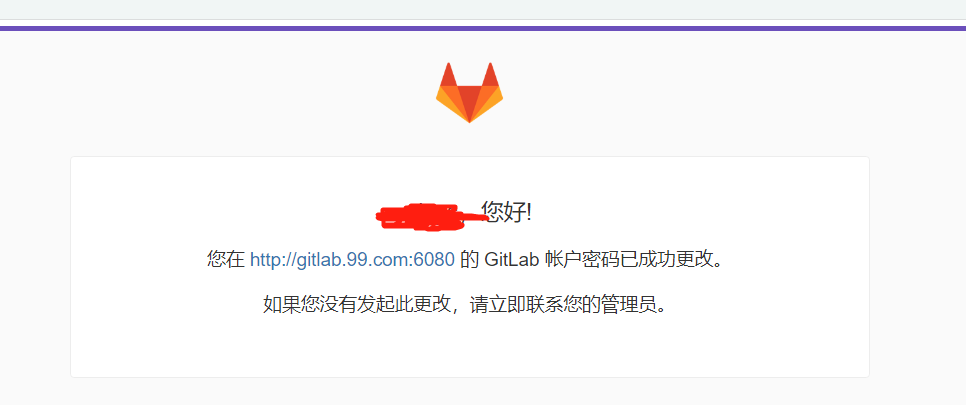
这里未使用gitlab自带的nginx配置中的80端口,所以需要修改nginx的配置文件,这样作的好处是邮件内容会显示完整的URL+PORT。
容器挂载目录: 三个目录需要挂载,创建容器前,需要配置好三个目录,
mkdir -p /opt/gitlab/{config,logs,data}
/opt/gitlab/config ---> /etc/gitlab
/opt/gitlab/logs ----> /var/log/gitlab
/opt/gitlab/data ----> /var/opt/gitlab
IP: 192.168.137.30
自定义域名: gitlab.99.com,通过windows的hosts文件解析到 192.168.137.30
2,安装命令。
docker run -d --hostname gitlab --publish 6443:443 --publish 6080:6080 --publish 6022:22 --name gitlab --volume /opt/gitlab/config:/etc/gitlab --volume /opt/gitlab/logs:/var/log/gitlab --volume /opt/gitlab/data:/var/opt/gitlab gitlab/gitlab-ce:14.3.6-ce.0
3,修改配置文件/opt/gitlab/config/gitlab.rb
具体要修改内容 如下:
## GitLab URL
##! URL on which GitLab will be reachable.
##! For more details on configuring external_url see:
##! https://docs.gitlab.com/omnibus/settings/configuration.html#configuring-the-external-url-for-gitlab
##!
##! Note: During installation/upgrades, the value of the environment variable
##! EXTERNAL_URL will be used to populate/replace this value.
##! On AWS EC2 instances, we also attempt to fetch the public hostname/IP
##! address from AWS. For more details, see:
##! https://docs.aws.amazon.com/AWSEC2/latest/UserGuide/instancedata-data-retrieval.html
##!设置外部访问域名,我这里使用自定义域名加端口
external_url 'http://gitlab.99.com:6080'
## Roles for multi-instance GitLab
##! The default is to have no roles enabled, which results in GitLab running as an all-in-one instance.
##! Options:
##! redis_sentinel_role redis_master_role redis_replica_role geo_primary_role geo_secondary_role
##! postgres_role consul_role application_role monitoring_role
##! For more details on each role, see:
##! https://docs.gitlab.com/omnibus/roles/README.html#roles
##!
# roles ['redis_sentinel_role', 'redis_master_role']
## Legend
##! The following notations at the beginning of each line may be used to
##! differentiate between components of this file and to easily select them using
##! a regex.
##! ## Titles, subtitles etc
##! ##! More information - Description, Docs, Links, Issues etc.
##! Configuration settings have a single # followed by a single space at the
##! beginning; Remove them to enable the setting.
##! **Configuration settings below are optional.**
################################################################################
################################################################################
## Configuration Settings for GitLab CE and EE ##
################################################################################
################################################################################
################################################################################
## gitlab.yml configuration
##! Docs: https://gitlab.com/gitlab-org/omnibus-gitlab/blob/master/doc/settings/gitlab.yml.md
################################################################################
# gitlab_rails['gitlab_ssh_host'] = 'ssh.host_example.com'
# gitlab_rails['gitlab_ssh_user'] = ''
##!设置时区
gitlab_rails['time_zone'] = 'Asia/Shanghai'
### Request duration
###! Tells the rails application how long it has to complete a request
###! This value needs to be lower than the worker timeout set in puma.
###! By default, we'll allow 95% of the the worker timeout
# gitlab_rails['max_request_duration_seconds'] = 57
### GitLab email server settings
###! Docs: https://docs.gitlab.com/omnibus/settings/smtp.html
###! **Use smtp instead of sendmail/postfix.**
##!配置smtp邮件信息,使用163mail
gitlab_rails['smtp_enable'] = true
gitlab_rails['smtp_address'] = "smtp.163.com"
gitlab_rails['smtp_port'] = 465
gitlab_rails['smtp_user_name'] = "123456@163.com"
gitlab_rails['smtp_password'] = "1234560806"
gitlab_rails['smtp_domain'] = "163.com"
gitlab_rails['smtp_authentication'] = "login"
gitlab_rails['smtp_enable_starttls_auto'] = true
gitlab_rails['smtp_tls'] = true
gitlab_rails['smtp_pool'] = false
###! **Can be: 'none', 'peer', 'client_once', 'fail_if_no_peer_cert'**
###! Docs: http://api.rubyonrails.org/classes/ActionMailer/Base.html
# gitlab_rails['smtp_openssl_verify_mode'] = 'none'
# gitlab_rails['smtp_ca_path'] = "/etc/ssl/certs"
# gitlab_rails['smtp_ca_file'] = "/etc/ssl/certs/ca-certificates.crt"
### Email Settings
##!开启邮箱功能
gitlab_rails['gitlab_email_enabled'] = true
##! If your SMTP server does not like the default 'From: gitlab@gitlab.example.com'
##! can change the 'From' with this setting.
##! 配置注册用户收到的提示信息账号.
gitlab_rails['gitlab_email_from'] = '123456@163.com'
gitlab_rails['gitlab_email_display_name'] = 'gitlab-admin'
gitlab_rails['gitlab_email_reply_to'] = '123456@163.com'
# gitlab_rails['gitlab_email_subject_suffix'] = ''
# gitlab_rails['gitlab_email_smime_enabled'] = false
# gitlab_rails['gitlab_email_smime_key_file'] = '/etc/gitlab/ssl/gitlab_smime.key'
# gitlab_rails['gitlab_email_smime_cert_file'] = '/etc/gitlab/ssl/gitlab_smime.crt'
# gitlab_rails['gitlab_email_smime_ca_certs_file'] = '/etc/gitlab/ssl/gitlab_smime_cas.crt'
### GitLab user privileges
# gitlab_rails['gitlab_default_can_create_group'] = true
# gitlab_rails['gitlab_username_changing_enabled'] = true
4、让修改后的配置生效
gitlab-ctl reconfigure
5、重启gitlab
gitlab-ctl restart
6,修改gitlab中nginx配置文件端口,修改成6080
作此修改端口后,gitlab每次发的邮件提示内容,就会是完整的URL+端口,直接点击,邮箱中的连接就可以正常登陆。
具体如下:
/opt/gitlab/data/nginx/conf/gitlab-http.conf
server {
listen *:6080;
修改完成后,重启gitlab
gitlab-ctl restart
7,测试登陆gitlab,并创建账号,会提示邮件收到相关信息。
转载请标明出处【Centos8使用docker配置gitlab,邮件设置,域名URL访问】。
《www.micoder.cc》
虚拟化云计算,系统运维,安全技术服务.
| Tags: | [阅读全文...] |
最新评论