CentOS7/RHEL 7安装KVM虚拟化并桥接网卡 |
| 发表者:admin分类:云计算容器2019-11-20 14:30:43 阅读[1866] |
CentOS7安装KVM虚拟化
一、KVM介绍
KVM,基于内核的虚拟机(英语:Kernel-based Virtual Machine,缩写为 KVM),
是一种用于Linux内核中的虚拟化基础设施,可以将Linux内核转化为一个hypervisor。
二、KVM部署及使用
1.系统环境查询

[root@localhost ~]# cat /etc/redhat-release
CentOS Linux release 7.5.1804 (Core)
[root@localhost ~]# uname -r
3.10.0-862.el7.x86_64
[root@localhost ~]# sestatus
SELinux status:                 enabled
SELinuxfs mount:                /sys/fs/selinux
SELinux root directory:         /etc/selinux
Loaded policy name:             targeted
Current mode:                   permissive
Mode from config file:          enforcing
Policy MLS status:              enabled
Policy deny_unknown status:     allowed
Max kernel policy version:      31


验证CPU是否支持虚拟化,输入有vmx或svm就支持,支持虚拟化则就支持KVM
[root@localhost ~]# cat /proc/cpuinfo | egrep 'vmx|svm'
有vmx或svm内容输出就支持,支持虚拟化则就支持KVM

查看是否加载KVM
[root@promote images]# lsmod | grep kvm
kvm_intel 174841 0
kvm 578518 1 kvm_intel
irqbypass 13503 1 kvm
已经加载,如果没有加载,则执行以下命令,加载KVM
[root@localhost ~]#modprobe kvm
配置网卡桥接,原来的主机网卡配置文件内容修改如下:
2.安装KVM虚拟化软件
安装依赖包(使用本地yum源)
# yum install libvirt* virt-* qemu-kvm* -y# yum -y install qemu-kvm qemu-kvm-tools qemu-img virt-manager libvirt libvirt-python libvirt-client bridge-utils virt-viewer virt-install
说明:
libvirt    # 虚拟机管理
virt       # 虚拟机安装克隆
qemu-kvm   # 管理虚拟机磁盘
启动KVM
# systemctl start libvirtd.service
# systemctl status libvirtd.servic
2.安装第一台KVM虚机
[root@localhost ~]# virt-install
--virt-type kvm
--os-type=linux
--os-variant rhel7
--name centos7
--memory 1024
--vcpus 1
--disk (虚拟硬盘绝对路径),format=raw,size=10
--cdrom (iso镜像文件绝对路径)
--network network=default
--noautoconsole
注意:需要先将镜像文件拷贝到 设置的路径下
参数说明
参数 | 参数说明 |
--virt-type HV_TYPE | 要使用的管理程序名称 (kvm, qemu, xen, ...) |
--os-type | 系统类型 |
--os-variant DISTRO_VARIANT | 在客户机上安装的操作系统,例如:'fedora18'、'rhel6'、'winxp' 等。 |
-n NAME, --name NAME | 客户机实例名称 |
--memory MEMORY | 配置客户机虚拟内存大小 |
--vcpus VCPUS | 配置客户机虚拟 CPU(vcpu) 数量。 |
--disk DISK | 指定存储的各种选项。 |
-cdrom CDROM | 光驱安装介质 |
-w NETWORK, --network NETWORK | 配置客户机网络接口。 |
--graphics GRAPHICS | 配置客户机显示设置。 |
虚拟化平台选项: | |
-v, --hvm | 这个客户机应该是一个全虚拟化客户机 |
-p, --paravirt | 这个客户机应该是一个半虚拟化客户机 |
--container | 这个客户机应该是一个容器客户机 |
--virt-type HV_TYPE | 要使用的管理程序名称 (kvm, qemu, xen, ...) |
--arch ARCH | 模拟 CPU 架构 |
--machine MACHINE | 机器类型为仿真类型 |
其它选项: | |
--noautoconsole | 不要自动尝试连接到客户端控制台 |
--autostart | 主机启动时自动启动域。 |
--noreboot | 安装完成后不启动客户机。 |
3.KVM虚机管理
virsh命令常用参数总结
参数 | 参数说明 |
基础操作 | |
list | 查看虚拟机列表,列出域 |
start | 启动虚拟机,开始一个(以前定义的)非活跃的域 |
shutdown | 关闭虚拟机,关闭一个域 |
destroy(危险) | 强制关闭虚拟机,销毁(停止)域 |
vncdisplay | 查询虚拟机vnc端口号 |
配置管理操作 | |
dumpxml | 导出主机配置信息 |
undefine | 删除主机 |
define | 导入主机配置 |
domrename | 对虚拟机进行重命名 |
挂起与恢复 | |
suspend | 挂起虚拟机 |
resume | 恢复虚拟机 |
自启动管理 | |
autostart | 虚拟机开机启动 |
autostart --disable | 取消虚拟机开机启动 |
以上参数通过 “virsh --help” 获得。 | |
查看虚拟机配置文件
[root@localhost ~]# cat /etc/libvirt/qemu/test01.xml修改KVM虚拟机配置的方法
[root@localhost ~]# virsh edit test01 (使用该命令修改可以对文件进行语法校验)Running virt-install to Build the KVM Guest System
The virt-install utility must be run as root and accepts a wide range of command-line arguments that are used to provide configuration information related to the virtual machine being created. Some of these command-line options are mandatory (specifically name, ram and disk storage must be provided) while others are optional. A summary of these arguments is outlined in the following table:
Argument | Description |
|---|---|
| -h, --help | Show the help message and exit |
| --connect=CONNECT | Connect to a non-default hypervisor. |
| -n NAME, --name=NAME | Name of the new guest virtual machine instance. This must be unique amongst all guests known to the hypervisor on the connection, including those not currently active. To re-define an existing guest, use the virsh(1) tool to shut it down (’virsh shutdown’) & delete (’virsh undefine’) it prior to running "virt-install". |
| -r MEMORY, --ram=MEMORY | Memory to allocate for guest instance in megabytes. If the hypervisor does not have enough free memory, it is usual for it to automatically take memory away from the host operating system to satisfy this allocation. |
| --arch=ARCH | Request a non-native CPU architecture for the guest virtual machine. The option is only currently available with QEMU guests, and will not enable use of acceleration. If omitted, the host CPU architecture will be used in the guest. |
| -u UUID, --uuid=UUID | UUID for the guest; if none is given a random UUID will be generated. If you specify UUID, you should use a 32-digit hexadecimal number. UUID are intended to be unique across the entire data center, and indeed world. Bear this in mind if manually specifying a UUID |
| --vcpus=VCPUS | Number of virtual cpus to configure for the guest. Not all hypervisors support SMP guests, in which case this argument will be silently ignored |
| --check-cpu | Check that the number virtual cpus requested does not exceed physical CPUs and warn if they do. |
| --cpuset=CPUSET | Set which physical cpus the guest can use. "CPUSET" is a comma separated list of numbers, which can also be specified in ranges. If the value ’auto’ is passed, virt-install attempts to automatically determine an optimal cpu pinning using NUMA data, if available. |
| --os-type=OS_TYPE | Optimize the guest configuration for a type of operating system (ex. ’linux’, ’windows’). This will attempt to pick the most suitable ACPI & APIC settings, optimally supported mouse drivers, virtio, and generally accommodate other operating system quirks. See "--os-variant" for valid options. For a full list of valid options refer to the man page (man virt-install). |
| --os-variant=OS_VARIANT | Further optimize the guest configuration for a specific operating system variant (ex. ’fedora8’, ’winxp’). This parameter is optional, and does not require an "--os-type" to be specified. For a full list of valid options refer to the man page (man virt-install). |
| --host-device=HOSTDEV | Attach a physical host device to the guest. HOSTDEV is a node device name as used by libvirt (as shown by ’virsh nodedev-list’). |
| --sound | Attach a virtual audio device to the guest. (Full virtualization only). |
| --noacpi | Override the OS type / variant to disables the ACPI setting for fully virtualized guest. (Full virtualization only). |
| -v, --hvm | Request the use of full virtualization, if both para & full virtualization are available on the host. This parameter may not be available if connecting to a Xen hypervisor on a machine without hardware virtualization support. This parameter is implied if connecting to a QEMU based hypervisor. |
| -p, --paravirt | This guest should be a paravirtualized guest. If the host supports both para & full virtualization, and neither this parameter nor the "--hvm" are specified, this will be assumed. |
| --accelerate | When installing a QEMU guest, make use of the KVM or KQEMU kernel acceleration capabilities if available. Use of this option is recommended unless a guest OS is known to be incompatible with the accelerators. The KVM accelerator is preferred over KQEMU if both are available. |
| -c CDROM, --cdrom=CDROM | File or device use as a virtual CD-ROM device for fully virtualized guests. It can be path to an ISO image, or to a CDROM device. It can also be a URL from which to fetch/access a minimal boot ISO image. The URLs take the same format as described for the "--location" argument. If a cdrom has been specified via the "--disk" option, and neither "--cdrom" nor any other install option is specified, the "--disk" cdrom is used as the install media. |
| -l LOCATION, --location=LOCATION | Installation source for guest virtual machine kernel+initrd pair. The "LOCATION" can take one of the following forms:
|
| --pxe | Use the PXE boot protocol to load the initial ramdisk and kernel for starting the guest installation process. |
| --import | Skip the OS installation process, and build a guest around an existing disk image. The device used for booting is the first device specified via "--disk" or "--file". |
| --livecd | Specify that the installation media is a live CD and thus the guest needs to be configured to boot off the CDROM device permanently. It may be desirable to also use the "--nodisks" flag in combination. |
| -x EXTRA, --extra-args=EXTRA | Additional kernel command line arguments to pass to the installer when performing a guest install from "--location". |
| --disk=DISKOPTS | Specifies media to use as storage for the guest, with various options. |
| --disk opt1=val1,opt2=val2,... | To specify media, one of the following options is required:
|
| -f DISKFILE, --file=DISKFILE | Path to the file, disk partition, or logical volume to use as the backing store for the guest’s virtual disk. This option is deprecated in favor of "--disk". |
| -s DISKSIZE, --file-size=DISKSIZE | Size of the file to create for the guest virtual disk. This is deprecated in favor of "--disk". |
| --nonsparse | Fully allocate the storage when creating. This is deprecated in favort of "--disk" |
| --nodisks | Request a virtual machine without any local disk storage, typically used for running ’Live CD’ images or installing to network storage (iSCSI or NFS root). |
| -w NETWORK, --network=NETWORK | Connect the guest to the host network. The value for "NETWORK" can take one of 3 formats:
|
| -b BRIDGE, --bridge=BRIDGE | Bridge device to connect the guest NIC to. This parameter is deprecated in favour of the "--network" parameter. |
| -m MAC, --mac=MAC | Fixed MAC address for the guest; If this parameter is omitted, or the value "RANDOM" is specified a suitable address will be randomly generated. For Xen virtual machines it is required that the first 3 pairs in the MAC address be the sequence ’00:16:3e’, while for QEMU or KVM virtual machines it must be ’54:52:00’. |
| --nonetworks | Request a virtual machine without any network interfaces. |
| --vnc | Setup a virtual console in the guest and export it as a VNC server in the host. Unless the "--vncport" parameter is also provided, the VNC server will run on the first free port number at 5900 or above. The actual VNC display allocated can be obtained using the "vncdisplay" command to "virsh" (or virt-viewer(1) can be used which handles this detail for the use). |
| --vncport=VNCPORT | Request a permanent, statically assigned port number for the guest VNC console. Use of this option is discouraged as other guests may automatically choose to run on this port causing a clash. |
| --sdl | Setup a virtual console in the guest and display an SDL window in the host to render the output. If the SDL window is closed the guest may be unconditionally terminated. |
| --nographics | No graphical console will be allocated for the guest. Fully virtualized guests (Xen FV or QEmu/KVM) will need to have a text console configured on the first serial port in the guest (this can be done via the --extra-args option). Xen PV will set this up automatically. The command ’virsh console NAME’ can be used to connect to the serial device. |
| --noautoconsole | Don’t automatically try to connect to the guest console. The default behaviour is to launch a VNC client to display the graphical console, or to run the "virsh" "console" command to display the text console. Use of this parameter will disable this behaviour. |
| -k KEYMAP, --keymap=KEYMAP | Request that the virtual VNC console be configured to run with a non- English keyboard layout. |
| -d, --debug | Print debugging information to the terminal when running the install process. The debugging information is also stored in "$HOME/.virtinst/virt-install.log" even if this parameter is omitted. |
| --noreboot | Prevent the domain from automatically rebooting after the install has completed. |
| --wait=WAIT | Amount of time to wait (in minutes) for a VM to complete its install. Without this option, virt-install will wait for the console to close (not neccessarily indicating the guest has shutdown), or in the case of --noautoconsole, simply kick off the install and exit. Any negative value will make virt-install wait indefinitely, a value of 0 triggers the same results as noautoconsole. If the time limit is succeeded, virt-install simply exits, leaving the virtual machine in its current state. |
| --force | Prevent interactive prompts. If the intended prompt was a yes/no prompt, always say yes. For any other prompts, the application will exit. |
| --prompt | Specifically enable prompting. Default prompting is off (as of virtinst 0.400.0) |
An Example CentOS virt-install Command
With reference to the above command-line argument list, we can now look at an example command-line construct using the virt-install tool.
The following command creates a new KVM virtual machine configured to run Windows 7 using full virtualization. It creates a new, 10GB disk image, assigns 512MB of RAM to the virtual machine, configures a CD device for the installation media and uses VNC to display the console:
virt-install --name myWin7 –-hvm --ram 512 --disk path=/tmp/win7.img,size=10
--network network:default --vnc --os-variant vista --cdrom /dev/hda
Note that the above command line assumes the installation media is in a drive corresponding to device file /dev/hda. This may differ on your system, or may be replaced by a path to an ISO image file residing on a file system.
As the creation process runs, the virt-install command will display status updates of the creation progress:
Starting install...
Creating storage file...                                 | 6.0 GB     00:00
Creating domain...                                       |    0 B     00:00
Domain installation still in progress. Waiting for installation to complete.
Install KVM Hypervisor on CentOS 7.x and RHEL 7.x
KVM is an open source hardware virtualization software through which we can create and run multiple Linux based and windows based virtual machines simultaneously. KVM is known as Kernel based Virtual Machine because when we install KVM package then KVM module is loaded into the current kernel and turns our Linux machine into a hypervisor.
In this post first we will demonstrate how we can install KVM hypervisor on CentOS 7.x and RHEL 7.x and then we will try to install virtual machines.
Before proceeding KVM installation, let’s check whether your system’s CPU supports Hardware Virtualization.
Run the beneath command from the console.
[root@linuxtechi ~]# grep -E '(vmx|svm)' /proc/cpuinfo
We should get the word either vmx or svm in the output, otherwise CPU doesn’t support virtualization.
Step:1 Install KVM and its associate packages
Run the following yum command to install KVM and its associated packages.
[root@linuxtechi ~]# yum install qemu-kvm qemu-img virt-manager libvirt libvirt-python libvirt-client virt-install virt-viewer bridge-utils
Start and enable the libvirtd service
[root@linuxtechi ~]# systemctl start libvirtd
[root@linuxtechi ~]# systemctl enable libvirtd
Run the beneath command to check whether KVM module is loaded or not
[root@linuxtechi ~]# lsmod | grep kvm
kvm_intel             162153  0
kvm                   525409  1 kvm_intel
[root@linuxtechi ~]#
In Case you have Minimal CentOS 7 and RHEL 7 installation , then virt-manger will not start for that you need to install x-window package.
[root@linuxtechi ~]# yum install "@X Window System" xorg-x11-xauth xorg-x11-fonts-* xorg-x11-utils -y
Reboot the Server and then try to start virt manager.
Step:2 Start the Virt Manager
Virt Manager is a graphical tool through which we can install and manage virtual machines. To start the virt manager type the ‘virt-manager‘ command from the terminal.
[root@linuxtechi ~]# virt-manager
Step:3 Configure Bridge Interface
Before Start creating VMs , let’s first create the bridge interface. Bridge interface is required if you want to access virtual machines from outside of your hypervisor network.
[root@linuxtechi ~]# cd /etc/sysconfig/network-scripts/
[root@linuxtechi network-scripts]# cp ifcfg-eno49 ifcfg-br0
[root@linuxtechi network-scripts]#
Edit the Interface file and set followings:
[root@linuxtechi network-scripts]# vi ifcfg-eno49
TYPE=Ethernet
BOOTPROTO=static
DEVICE=eno49
ONBOOT=yes
BRIDGE=br0
Edit the Bridge file (ifcfg-br0) and set the followings:
[root@linuxtechi network-scripts]# vi ifcfg-br0
TYPE=Bridge
BOOTPROTO=static
DEVICE=br0
ONBOOT=yes
IPADDR=192.168.10.21
NETMASK=255.255.255.0
GATEWAY=192.168.10.1
DNS1=192.168.10.11
Replace the IP address and DNS server details as per your setup.
Restart the network Service to enable the bridge interface.
[root@linuxtechi ~]#  systemctl restart NetworkManager.service
[root@linuxtechi ~]#
Check the Bridge interface using below command :
[root@linuxtechi ~]# ip addr show br0
Step:4 Start Creating Virtual Machines.
Now Create Virtual Machine either from the command line using ‘virt-install‘ command or from GUI (virt-manager )
Let’s Create a virtual machine of “Windows Server 2012 R2” using virt-manager.
Start the “virt-manager”
Go to the File Option, click on “New Virtual Machine”
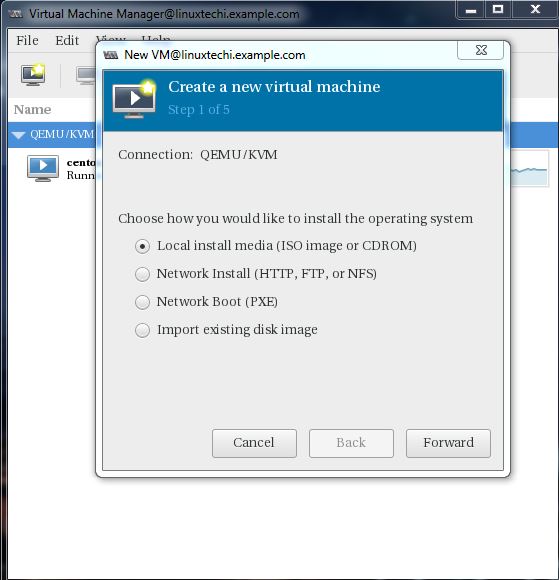
We will be using ISO file as installation media. In the next step Specify the path of ISO file.
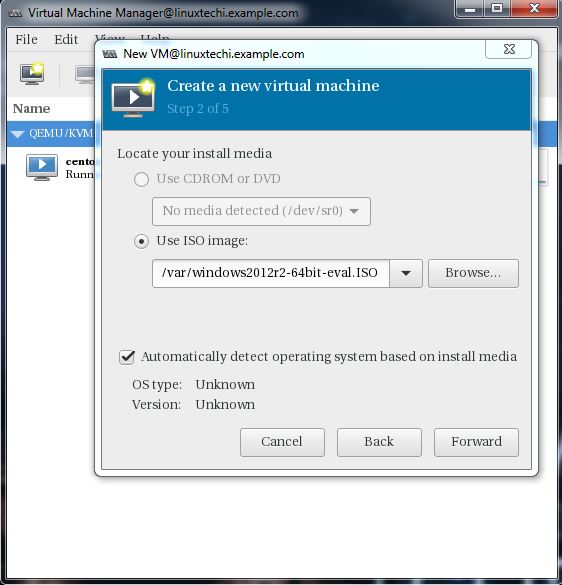
Click on Forward.
Specify the Compute Resources : RAM and CPU as per your setup.
Click on Forward to proceed further.
Specify the storage Size of Virtual Machine, In my case I am using 25G.
In the Next step Specify the Name of Virtual Machine and select network as ‘ Bridge bro’
Click on Finish to start the installation.
Follow the screen instructions and complete the installation.
Creating a virtual Machine from Command Line:
Virtual Machines can be created from the console as well using ‘virt-install’ command. In the following example i going to virtual machine of Ubuntu 16.04 LTS.
[root@linuxtechi ~]# virt-install --name=Ubuntu-16-04 --file=/var/lib/libvirt/images/ubuntu16-04.dsk --file-size=20 --nonsparse --graphics spice --vcpus=2 --ram=2048 --cdrom=ubuntu-16.04-server-amd64.iso --network bridge=br0 --os-type=linux --os-variant=generic
Starting install...
Allocating 'ubuntu16-04.dsk'               | 20 GB 00:00:00
Creating domain...
Follow the instruction now and complete the installation.
In the above ‘virt-install’ command we have used following options :
- –name = <Name of the Virtual Machine>
- –file = <Location where our virtual machine disk file will be stored >
- –file-size = < Size of the Virtual Machine, in my case it is 20GB >
- –nonsparse = < Allocate the whole storage while creating>
- –graphics = < Specify the graphical tool for interactive installation, in above example I am using spice >
- –vcpu = < Number of virtual CPU for the Machine >
- –ram = < RAM size for the virtual Machine >
- –cdrom = < Virtual CD ROM which specify the installation media like ISO file >
- –network = < it is used to specify which network we will use for the virtual machine, in this example I am bridge interface>
- –os-type = < Operating system type like linux and window>
- –os-variant= <KVM maintains the OS variants like ‘fedora18′, ‘rhel6’ and ‘winxp’ , this option is optional and if you not sure about OS variant you can mentioned it as generic>
Once the Installation is completed we can access the Virtual Machine console from ‘virt-manager‘ as shown below.
That’s it, basic installation and configuration of KVM hypervisor is completed.
Virtualization in Linux: Installing KVM on CentOS & RHEL
In this tutorial, we will be installing KVM on CentOS or RHEL machines. KVM (also called QEMU) or Kernel Based Virtualization Machine is a Hardware based virtualization software that provide a Linux system capability to run multiple operating systems in Linux environment. It can run Linux as well as Windows family OS.
By hardware based virtualization, it means that your processor must support hardware virtualization to run KVM on your system. So if your processor is Intel based, it must support Intel VT or if you are using AMD based processor, it must support AMD-V. So before we proceed further with this tutorial we must check if your processor supports hardware virtualization or not. Most of the modern processors do support hardware virtualization but to be sure, please run the following command,
$ egrep ‘(vmx|svm)’ /proc/cpuinfo
If you receive ‘vmx or svm’ in the output than processor supports hardware virtualization otherwise it doesn’t support it & you can’t install KVM/QEMU on your machine.
KVM/QEMU can be managed either graphically or through CLI. We use virt-manager for managing virtual machines, it can create, delete, edit & can also cold/live migrate guest machines between hosts.
Installing KVM on CentOS or RHEL
For installing KVM, run the following command,
$ yum install qemu-kvmqemu-imgvirt-manager libvirtlibvirt-python libvirt-client virt-install virt-viewer
Now, let’s have a brief look at what these packages actually are,
- qemu-kvm is QEMU emulator, it’s the main package for KVM,
- qemu-img is QEMU disk image manager,
- virt-install is a command line tool to create virtual machines.
- libvirt , it provides daemon to manage virtual machines and controls hypervisor.
- libvirt-client , it provides client side API’s for accessing servers and virsh utility which provides command line tool to manage virtual machines.
- virt-viewer is the graphical console.
QEMU is now ready, we will now restart our virtualization daemon called ‘libvertd’,
$ systemctl restart libvertd
We will now create virtual machine with the help of virt-manager. But before we start with creating a virtual machine, we will have to configure a bridge adapter, which is required if we need to access outside network from our VM.
Creating a Bridge adapter
Copy file for your current network interface ‘ifcfg-en0s1’ to another file for bridge interface named ‘ifcfg-br0’
$ cd /etc/sysconfig/network-scripts/
$ cp ifcfg-en0s1 ifcfg-br0
Now we will edit the file ‘ifcfg-br0’,
$ vi ifcfg-br0
TYPE=Bridge
BOOTPROTO=static
DEVICE=br0
ONBOOT=yes
IPADDR=192.168.1.110
NETMASK=255.255.255.0
GATEWAY=192.168.1.1
DNS1=8.8.8.8
Change network settings as per your own network requirements. Save the file & restart network services.
$ systemctl restart network
Now let’s create our first virtual machine.
Creating a Virtual Machine
We will launch ‘virt-manager’ to create our first virtual machine. You can launch viet-manager either using CLI or graphically,
For CLI, launch your terminal & type
$ virt-manager
Or Virtual machine manager in you Application under system tools. Once it has been launched, goto ‘File’ & click on ‘New Virtual Machine’

We will be using an ISO image for our installation, so select ‘Local Install Media’ for installing OS,

next , select the location for your ISO image & click Forward,

on the next page, select ‘Memory’ & number of ‘CPUs’ & click Forward,

specify the storage size for your VM & click Forward,

On the next page will be the summary for our VM, review all the configurations & in Network selection , select bridged adapter ‘br0’ & hit finish. Now install the OS as you normally do & boot into VM once the installation has been completed. Similarly create as many VMs as you need & as your resources permit.
This concludes our tutorial for installing KVM on CentOS. if you are having any issues or have any suggestions, please feel free to submit them through comment box down below.
转载请标明出处【 CentOS7/RHEL 7安装KVM虚拟化并桥接网卡】。
《www.micoder.cc》
虚拟化云计算,系统运维,安全技术服务.
| Tags: | [阅读全文...] |
最新评论